Ok so you’ve got the scripts from part 1 and you’ve found your special url from part 2. Now it’s time to bring it all together and actually make it work!
You’ll need some sort of linux pc like a raspberry pi or similar, perhaps even a pi zero, or even just a regular linux pc. I’ve got the live monitoring part running on a Raspberry pi 2 and the logging part running on another random linux pc. It doesn’t really make much difference. The stuff we’re doing here is pretty basic and universal so you should be pretty much good to go regardless of the platform.
That said – I’m going to be assuming we’re using a fresh install on Raspbian on a raspberry pi. If you’re using something else you may need to vary the instructions slightly.
I’m also going to assume you’re running the “Live monitoring” and “Logging” parts of the scripts on the same machine. If you’re running it on separate machines the process is mostly the same, just do the relevant bits on each machine respectively..
You can happily run the live monitoring script and the logging scripts on the same machine or on different machines, or whatever. With a bit of care you can even run the scripts on the Pi at one location, but be monitoring an IP cam which is at another location. There’s potential security issues with that so you need to pay a little bit more attention to user levels and having good passwords but it’s totally doable (and we’ll cover the security side later).
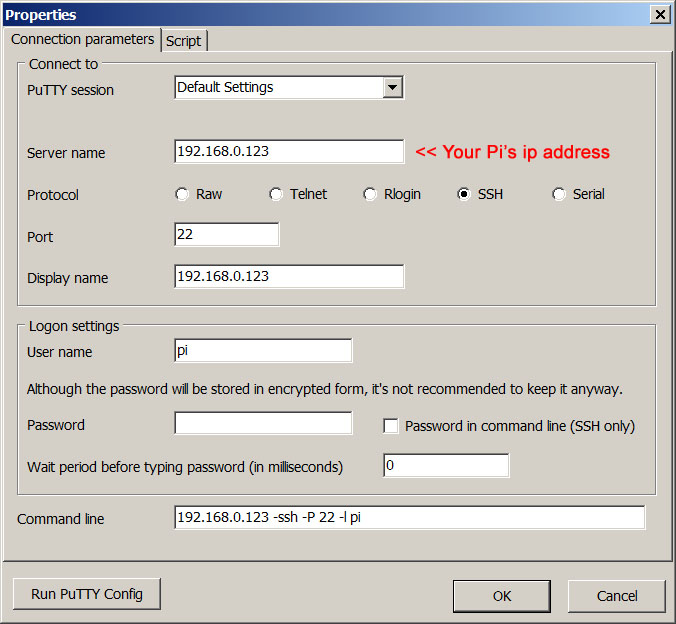
You’ll need some sort of SSH/terminal client to connect to your Pi and enter the special url into the scripts. I’m working on a windows machine so am using PuTTY/MtPuTTY which is free and works well but if you’re on a mac or whatever you’ll need to use one for your platform, though with mac being linux-based you can probably just open up a terminal window and ssh directly from there. I don’t have a mac so i can’t really comment.
For editing the bash scripts on the Pi we’ll be using “nano” which is a super simple terminal-based text editor and is present on pretty much any machine. Some people prefer Vi which is fine but those people likely don’t need my help writing shell scripts 😉 I find nano much more intuitive than Vi.
Get the scripts needed onto your Pi
If you haven’t got them already get the files from part 1 then fire up your ssh client and log into your Raspberry Pi:
once logged in, you should be in your home folder. You can check where you are by entering “pwd”.
NOTE: In the terminal/console bits I’ll put what you’re supposed to type in bold. The rest is the responses you should get from the system. Errors in red, important bits to note are in pink.
pi@pi1 ~ $ pwd
/home/pi
If using a freshly installed Pi with Raspbian you should already have wget installed, if not you can check your machine has it installed like this (if not type Y to install it if prompted):
pi@pi1 ~ $ sudo apt-get install wget
Reading package lists... Done
Building dependency tree
Reading state information... Done
wget is already the newest version.
0 upgraded, 0 newly installed, 0 to remove and 84 not upgraded.
pi@pi1 ~ $
Next download the CCTV script we need directly onto your Pi (from the bottom of part 1 of this guide) by typing the following.
pi@pi1:~ $ wget https://www.plus8.net/wp-content/uploads/2017/02/cctv.zip
--2017-02-25 19:59:43-- https://www.plus8.net/wp-content/uploads/2017/02/cctv.zip
Resolving www.plus8.net (www.plus8.net)... 104.18.56.36, 104.18.57.36
Connecting to www.plus8.net (www.plus8.net)|104.18.56.36|:443... connected.
HTTP request sent, awaiting response... 200 OK
Length: 3267 (3.2K) [application/zip]
Saving to: ‘cctv.zip’

cctv.zip 100%[===========================================>] 3.19K --.-KB/s in 0.001s

2017-02-25 19:59:44 (3.21 MB/s) - ‘cctv.zip’ saved [3267/3267]

pi@pi1:~ $
If you get a TLS error when connecting to download the file with wget then you probably have an old version of Raspbian, or the pi firmware etc. I managed to break the OS install of my live monitoring Pi when trying to do the upgrades to fix that (while writing this) so I don’t recommend trying. If you get the error I’d suggest using curl to download the files instead, or download the files on your currennt computer/tablet and transfer them to the Pi manually using WinSCP (windows) or ES-file explorer (android):
That error looks a bit like this:
GnuTLS: A TLS fatal alert has been received. Unable to establish SSL connection.
In which case make sure you have curl installed:
pi@pi1 ~ $ sudo apt-get install curl
Reading package lists... Done
Building dependency tree
Reading state information... Done
curl is already the newest version.
0 upgraded, 0 newly installed, 0 to remove and 2 not upgraded.
then:
pi@pi1 ~ $ curl -o cctv.zip https://www.plus8.net/wp-content/uploads/2017/02/cctv.zip
 % Total % Received % Xferd Average Speed Time Time Time Current
 Dload Upload Total Spent Left Speed
100 3267 100 3267 0 0 12945 0 --:--:-- --:--:-- --:--:-- 18668
Alternatively you can download the zip files onto your PC/tablet/phone and transfer them onto the Pi manually using something like using winSCP (windows) or ES-file explorer (android)
Ok so hopefully now you should have the cctv.zip file in your home folder on your Pi. Check by typing “ls -l” and hopefully your home folder should look something like this:
pi@pi1:~ $ ls -l
total 40
-rw-r--r-- 1 pi pi 3267 Feb 18 22:11 cctv.zip
drwxr-xr-x 2 pi pi 4096 Nov 25 17:55 Desktop
drwxr-xr-x 5 pi pi 4096 Nov 25 17:55 Documents
drwxr-xr-x 2 pi pi 4096 Nov 25 18:09 Downloads
drwxr-xr-x 2 pi pi 4096 Nov 25 18:09 Music
drwxr-xr-x 2 pi pi 4096 Nov 25 18:09 Pictures
drwxr-xr-x 2 pi pi 4096 Nov 25 18:09 Public
drwxr-xr-x 2 pi pi 4096 Nov 25 17:55 python_games
drwxr-xr-x 2 pi pi 4096 Nov 25 18:09 Templates
drwxr-xr-x 2 pi pi 4096 Nov 25 18:09 Videos
pi@pi1:~ $
the size of the cctv.zip file should not be 0 – ideally 3267 bytes or thereabouts. The file size may change slightly as I make little tweaks and update the scripts.
Next check you have unzip installed:
pi@pi1:~ $ sudo apt-get install unzip
Reading package lists... Done
Building dependency tree
Reading state information... Done
unzip is already the newest version.
0 upgraded, 0 newly installed, 0 to remove and 148 not upgraded.
pi@pi1:~ $
then unzip the cctv.zip file:
pi@pi1:~ $ unzip cctv.zip
Archive: cctv.zip
 creating: cctv/
 creating: cctv/archived/
 inflating: cctv/clear.gif
 inflating: cctv/delete_old_archives.sh
 inflating: cctv/doarchive.sh
 inflating: cctv/index.htm
 creating: cctv/recorded/
 inflating: cctv/snapshot.sh
 inflating: cctv/square_green.gif
 inflating: cctv/square_red.gif
 inflating: cctv/webcam_log.txt
pi@pi1:~ $
now cd into the cctv folder and see what we have:
pi@pi1:~ $ cd cctv
pi@pi1:~/cctv $ ls -l
total 40
drwxr-xr-x 2 pi pi 4096 Feb 18 21:34 archived
-rw-r--r-- 1 pi pi 49 May 24 2010 clear.gif
-rw-r--r-- 1 pi pi 79 Feb 17 09:37 delete_old_archives.sh
-rw-r--r-- 1 pi pi 620 Feb 17 09:24 doarchive.sh
-rw-r--r-- 1 pi pi 1486 Feb 11 2016 index.htm
drwxr-xr-x 2 pi pi 4096 Feb 18 21:26 recorded
-rw-r--r-- 1 pi pi 772 Feb 16 23:29 snapshot.sh
-rw-r--r-- 1 pi pi 96 May 24 2010 square_green.gif
-rw-r--r-- 1 pi pi 96 May 24 2010 square_red.gif
-rw-r--r-- 1 pi pi 65 Feb 18 21:37 webcam_log.txt
pi@pi1:~/cctv $
Basically you have a “recorded” folder (for today’s JPEG snapshots), an “archived” folder (for previous days’ JPEGS archived into zip files), the index.htm file which is the live monitoring page, and a couple of scripts. The snapshot.sh script gets called every minute and handles saving the images from the camera and datestamping them. The doarchive.sh script zips up the previous day’s JPEGs into a daily archive zip file, and the delete_old_archives.sh checks for and deletes archives older than x days. There’s also a couple of tiny graphics for the live monitoring page to show it’s loading etc.
However, before we can run any of the scripts we’ll need to make them executable:
pi@pi1:~/cctv $ chmod +x *.sh
If you list the folder contents now you should see the .sh files have changed colour. If you’re using PuTTY they’ll have turned green and have an x in the attributes columns:
pi@pi1:~/cctv $ ls -l
total 40
drwxr-xr-x 2 pi pi 4096 Feb 18 21:34 archived
-rw-r--r-- 1 pi pi 49 May 24 2010 clear.gif
-rwxr-xr-x 1 pi pi 79 Feb 17 09:37 delete_old_archives.sh
-rwxr-xr-x 1 pi pi 620 Feb 17 09:24 doarchive.sh
-rw-r--r-- 1 pi pi 1486 Feb 11 2016 index.htm
drwxr-xr-x 2 pi pi 4096 Feb 18 21:26 recorded
-rwxr-xr-x 1 pi pi 772 Feb 16 23:29 snapshot.sh
-rw-r--r-- 1 pi pi 96 May 24 2010 square_green.gif
-rw-r--r-- 1 pi pi 96 May 24 2010 square_red.gif
-rw-r--r-- 1 pi pi 65 Feb 18 21:37 webcam_log.txt
Getting the logging working
That should mean we’re pretty much set. Now we can take the special url you found in the last part and test it works…
in the terminal type the following (replacing the values for your own):
pi@pi1:~/cctv $ wget -O snapshot_test.jpg http://username:password@192.168.0.123:8080/snapshot.cgi
In your case replace “username” and “password” with the username and password you use to log into your IP camera, replace “192.168.0.123“ with the IP address of your camera. If you run your camera on a non-standard port then replace “:8080” with “:yourportnumber” otherwise you can leave the “:8080” out altogether or just use “:80” which is the default. Lastly replace “snapshot.cgi“ with the special URL you found in the last part of the guide if it’s different (chances are it’ll be snapshot.cgi though).
Hit enter and if it worked it should do some stuff and you should have a file called snapshot_test.jpg.
pi@pi1:~/cctv $ wget -O snapshot_test.jpg http://user:password@192.168.0.123:8080/snapshot.cgi
--2017-02-25 20:33:42-- http://admin:*password*@192.168.0.123:8080/snapshot.cgi
Connecting to 192.168.0.123:8080... connected.
HTTP request sent, awaiting response... 401 Unauthorized
Connecting to 192.168.0.123:8080... connected.
HTTP request sent, awaiting response... 200 OK
Length: 15488 (15K) [image/jpeg]
Saving to: ‘snapshot_test.jpg’

snapshot_test.jpg 100%[===========================================>] 15.12K --.-KB/s in 0.04s

2017-02-25 20:33:42 (410 KB/s) - ‘snapshot_test.jpg’ saved [15488/15488]
I tested it was a valid JPG file by connecting to the Pi with WinSCP and hitting “open”, at which point it popped open in my default image viewer. You could connect equally well with a file manager on your android device like “ES file explorer” which lets you set up sftp connections very easily.
You may notice that the format of the URL is slightly different from the URL you extracted from the camera earlier, which is down to how wget handles the login form.
URL from camera:
http://192.168.0.123/snapshot.cgi?user=admin&pass=yourpassword
whereas for wget to work it needs to be of the format:
http://admin:yourpassword@192.168.0.123/snapshot.cgi
Either way if the image is a proper JPEG then you’re in business.
Edit the bash scripts to use your special URL:
Now that we know the URL works we need to edit the script to call your special URL and save a JPEG every few seconds. To make things easier to manage the script will append a timestamp to the end of the filename.
1 minute is the default smallest time interval linux cron can do and whilst there’s other types of cron you can install which can do smaller intervals I figured it was easier to just make a script which runs for just under a minute.
Hence the script will be called every minute by a cron event and will save an image from the special URL, wait a specified number of seconds, then save another etc etc up to 60 seconds, at which point the script quits and is called again by cron at the next minute.
All you need to do is put your special URL in there for where the script is to fetch the image from, set the time intervals you want and you’re ready to go.
So start off with typing:
pi@pi1:~/cctv $ sudo nano snapshot.sh
Which should bring up the script, which looks something like this:
#!/bin/bash

#set a cron job with this command to log the output: /home/pi/www/cctv/recorded/snapshot.sh >> /home/pi/www/cctv/recorded/webcam_log.txt


COUNTER=0

#sleep for this many seconds between snapshots
INTERVAL=5

#repeat snapshot this many times per minute. Interval*count should equal 60
#since the script should run for 1 minute
COUNT=12

FILENAME=ipcam

cd /home/pi/www/cctv/recorded

echo "RUNNING SCRIPT...."

while [ $COUNTER -lt $COUNT ]; do
 #echo The counter is $COUNTER
 current_time=$(date "+%Y-%m-%d--%H-%M-%S")
 echo "Current Time : $current_time"
 echo "saving image..."
 wget -O $FILENAME_$current_time.jpg http://username:password@192.168.0.123:8080/snapshot.cgi

 let COUNTER=COUNTER+1
 sleep $INTERVAL
done


echo "all done"
echo ""
The bits you’ll potentially need to edit are highlighted in pink. If you’re installing on a Pi in your home folder as shown here then you probably won’t have to change the paths but if you’re installing on another linux machine under a different username or in a different folder then you’ll have to update the paths to suit.
If you want to change the interval from every 5 seconds then please do – but make sure that the interval multiplied by the count equals 60. So if you’re making it take a pic every 30 sec make the count 2, if taking a pic every 10 sec make the count 6 etc.
Also you’ll need to change the actual URL which gets called to match the one you tested earlier.
Once you’re all done editing hit CTRL+X and then “y” to exit nano and save the script, and then you can run the script manually to test it by typing the following:
pi@pi1:~/cctv $ ./snapshot.sh
and if it worked you should see something like:
RUNNING SCRIPT....
Current Time : 2017-02-25--21-17-19
saving image...
--2017-02-25 21:17:19-- http://admin:*password*@192.168.0.123:8080/snapshot.cgi
Connecting to 192.168.0.123:8080... connected.
HTTP request sent, awaiting response... 401 Unauthorized
Connecting to 192.168.0.123:8080... connected.
HTTP request sent, awaiting response... 200 OK
Length: 38088 (37K) [image/jpeg]
Saving to: ‘2017-02-25--21-17-19.jpg’

2017-02-25--21-17-19.jpg 100%[===========================================>] 37.20K --.-KB/s in 0.009s

2017-02-25 21:17:19 (4.14 MB/s) - ‘2017-02-25--21-17-19.jpg’ saved [38088/38088]

Current Time : 2017-02-25--21-17-24
saving image...
--2017-02-25 21:17:24-- http://admin:*password*@192.168.0.123:8080/snapshot.cgi
Connecting to 192.168.0.123:8080... connected.
HTTP request sent, awaiting response... 401 Unauthorized
Connecting to 192.168.0.123:8080... connected.
HTTP request sent, awaiting response... 200 OK
Length: 37828 (37K) [image/jpeg]
Saving to: ‘2017-02-25--21-17-24.jpg’

2017-02-25--21-17-24.jpg 100%[===========================================>] 36.94K --.-KB/s in 0.02s

2017-02-25 21:17:24 (2.25 MB/s) - ‘2017-02-25--21-17-24.jpg’ saved [37828/37828]
You can CTRL+C to break from the script, then cd to the “recorded” folder and if it was successful you should see a few JPGs:
pi@pi1:~/cctv $ cd recorded/
pi@pi1:~/cctv/recorded $ ls
2017-02-25--21-17-19.jpg 2017-02-25--21-17-24.jpg
If there’s no JPEGs in the recorded folder then it’s likely you’ve missed a path setting somewhere in the snapshot.sh file. Check your home folder (/home/pi) as that’s where they’ll likely have ended up getting saved instead.
If it’s not working for some other reason check the terminal output for errors in the script which might give a clue as to what else is going wrong.
Once it’s all working and the JPEGs are ending up in the recorded folder where they should be, then you just need to add a line to the system cron to schedule the script to run every minute.
Open up the cron:
pi@pi1:~/cctv/ $ sudo nano /etc/crontab
and add the following lines towards the end:
#cctv
* * * * * pi /home/pi/cctv/snapshot.sh >> /home/pi/cctv/webcam_log.txt
That tells cron to run the script /home/pi/cctv/snapshot.sh every minute of every day and the “>>” means output the console feedback to the file webcam_log.txt in the cctv folder. That way if there’s an issue with it not working you can look at the logfile and potentially figure out why and when it went wrong.
Again you may have to edit the paths if you’re using different ones from the ones I’ve used here and you will have to change pi after the asterisks to your username if you’re not running on a Pi linux machine.
Once you’ve added that, hit CTRL+X followed by “y” to save and exit nano and your cron task should be set.
If you wait till the next minute has elapsed and cd into the “recorded” folder you should see JPEG files appearing every few seconds. If that’s the case it’s working!
Next part: “Archiving and cleanup, and setting up the Live monitor” coming soon 🙂